

How To Set Up Slingbox Pro Hd
USER GUIDE
PRO-Hard disk drive
Copyright © 2008 Sling Media, Inc., Sling Media, Slingbox, SlingPlayer, SlingPlayer Mobile, and SlingStream are the
registered trademarks of Sling Media, Inc. Other products and companies mentioned are the trademarks of their corresponding
owners and not Sling Media, Inc. This product is designed in the United States and manufactured in Indonesia. 082-10025
TABLE OF CONTENTS
WELCOME!. . . . . . . . . . . . . . . . . . . . . . . . . . . ane
Hither'S WHAT YOU Can CONNECT TO YOUR SLINGBOX . . . 2
BEFORE YOU BEGIN SETUP . . . . . . . . . . . . . . . . . . 3
Stride 1: CONNECT YOUR Hard disk And thenURCE . . . . . . . . . . . . iv
Pace 2: CONNECT YOUR SD SOURCE. . . . . . . . . . . . . vi
STEP iii: CONNECT YOUR COAX And thenURCE . . . . . . . . . . . viii
STEP four: ATTACH THE REMOTE CONTROL IR Cablevision . . . . . 9
STEP v: LINK TO YOUR NETWORK . . . . . . . . . . . . . . . 10
STEP 6: ATTACH THE POWER AdvertizingAPTER . . . . . . . . . . . . 11
STEP 7: INSTALL THE SOFTWARE . . . . . . . . . . . . . . . 12
Stride viii: ENJOY YOUR SLINGBOX! . . . . . . . . . . . . . . . 12
TROUBLESHOOTING . . . . . . . . . . . . . . . . . . . . . . 13
TECHNICAL SPECIFICATIONS . . . . . . . . . . . . . . . . . 14
Due westARRANTY, CondomTY, REGULATORY, . . . . . . . . . . . . . . 15
AND LEGAL INFORMATION
WELCOmE!
Thank you for purchasing the Slingbox PRO-HD. Follow these instructions to connect
your new Slingbox and to start watching your Tv programs almost anywhere.
If you run into any bug forth the way, visit our support web site where you
can find video tutorials, technical articles and ways to contact Sling for help:
http://support.slingmedia.com
one
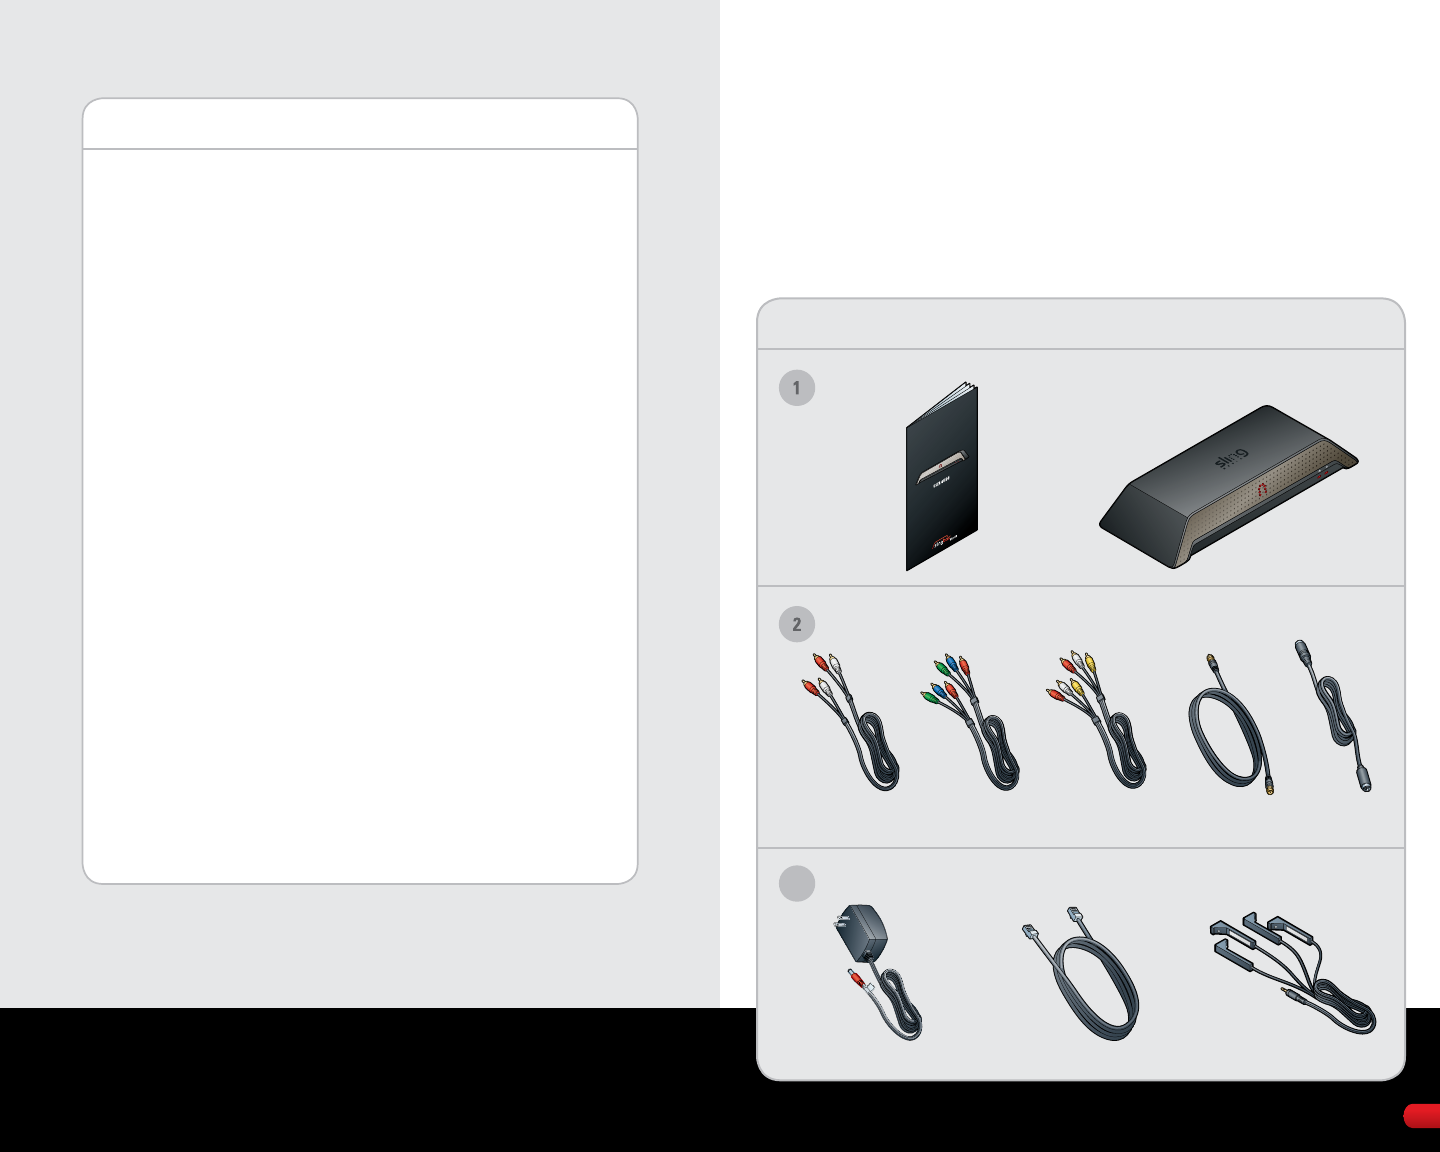
WHAT'S IN THE BOX:
User Guide
Audio and Video (AV) Accessories
Power and Network Accessories
Power Adapter
Stereo
Audio Cable
Ethernet Cablevision Remote Control IR Cable
Component
Video Cable
Composite
AFive Cablevision
Coax
Cable
Due south- Video
Cable
Slingbox PRO-HD
3
To make the setup process easier, write practicewn the type, make and model of the
A/V sources, forth with data nigh your abode network. This will come in
handy when you lot configure the software later on.
Hd- High Definition Source
SOURCE TYPE: [EX: Digital Video Recorder (DVR)]
BRAND: [EX : Dish Network]
MODEL: [EX : ViP722]
SD- Standard Definition Source
SOURCE Blazon: [EX: Video Cassette Recorder (VCR)]
BRAND:
MODEL:
COAX- Coaxial Source
SOURCE Type: [EX: Cable TV]
Brand:
MODEL:
Networg Information
ROUTER BRAND AND MODEL:
MODEM BRAND AND MODEL:
Cyberspace SERVICE PROVIDER: (Internet access provider)
TYPE OF INTERNET SERVICE: [EX: DSL]
NOTE: THE SLINGBOX PRO-Hard disk drive SUPPORTS RESOLUTIONS UP TO
1080i. IF YOUR A/V And soURCE OUTPUTS ane080p, YOU MUST SET IT TO
1080i . THE SLINGBOX Will NOT Work WITH 1080p.
TIP: Your Slingbox comes with component, composite, and coaxial cables to laissez passer-
through connections to your TV or set height box. Utilize the highest quality connection that
your Tv set has available.
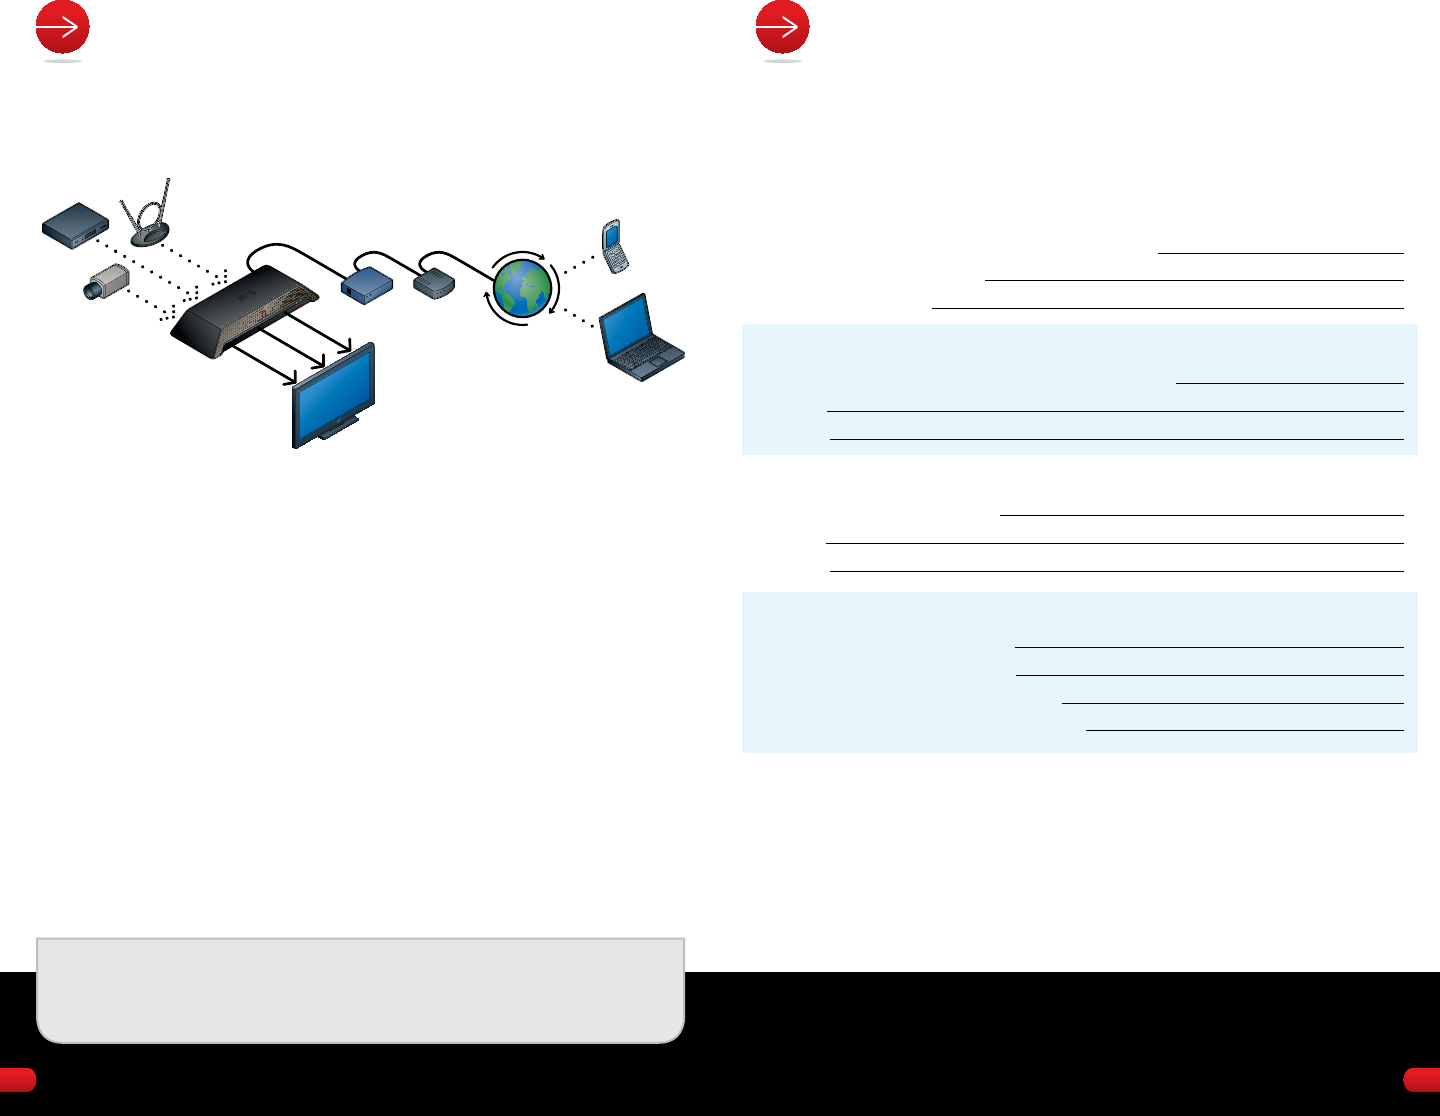
The Slingbox PRO-HD supports connecting up to three sound/video sources:
• One loftier denition (HD) device using component cables for video. You can
use either analog or digital cables for audio.
• One standard denition (SD) device using composite cables for audio and
video. If your A/V device has S-Video, you can use an S-Video cable for video.
• I coaxial (COAX) device. Employ a coaxial cablevision for both sound and video.
Choose the highest quality connectedness that each A/V source has available. If you
haveast two devices that use the same kind of connection, connect the one that
you westwardatch virtually often.
Earlier YOU BEGIN SETUP:
Hither'South WHAT YOU Can CONNECT TO
YOUR SLINGBOX:
32
AUDIO:
Analog audio connectors are usually red and white. To connect
using analog audio, use the included stereo sound cable. The
red connector is for the right audio channel, and white is for the
left sound channel. Insert 1 stop of these sound cables into the
jacks labeled IN on your Slingbox PRO-HD. These jacks are also
in the peak row on the back of your Slingbox. Insert the other
end into the sound output jacks on your A/V source. These jacks
are typically labeled AUDIO OUT.
TIP: If your HD source has digital audio, connect it for
better audio. Digital audio connections are usually
orange. These connections are also chosen S/PDIF
(Sony/Philips Digital Interface) audio. Connect one finish
of the Due south/PDIF audio cable (sold separately) to the orange
jacm labeled IN on your Slingboten PRO-HD. Connect the
other end to the output S/PDIF audio jacthousand on your A / V
source. These audio jacks are typically labeled DIGITAL
AUDIO OUT or S/PDIF OUT.
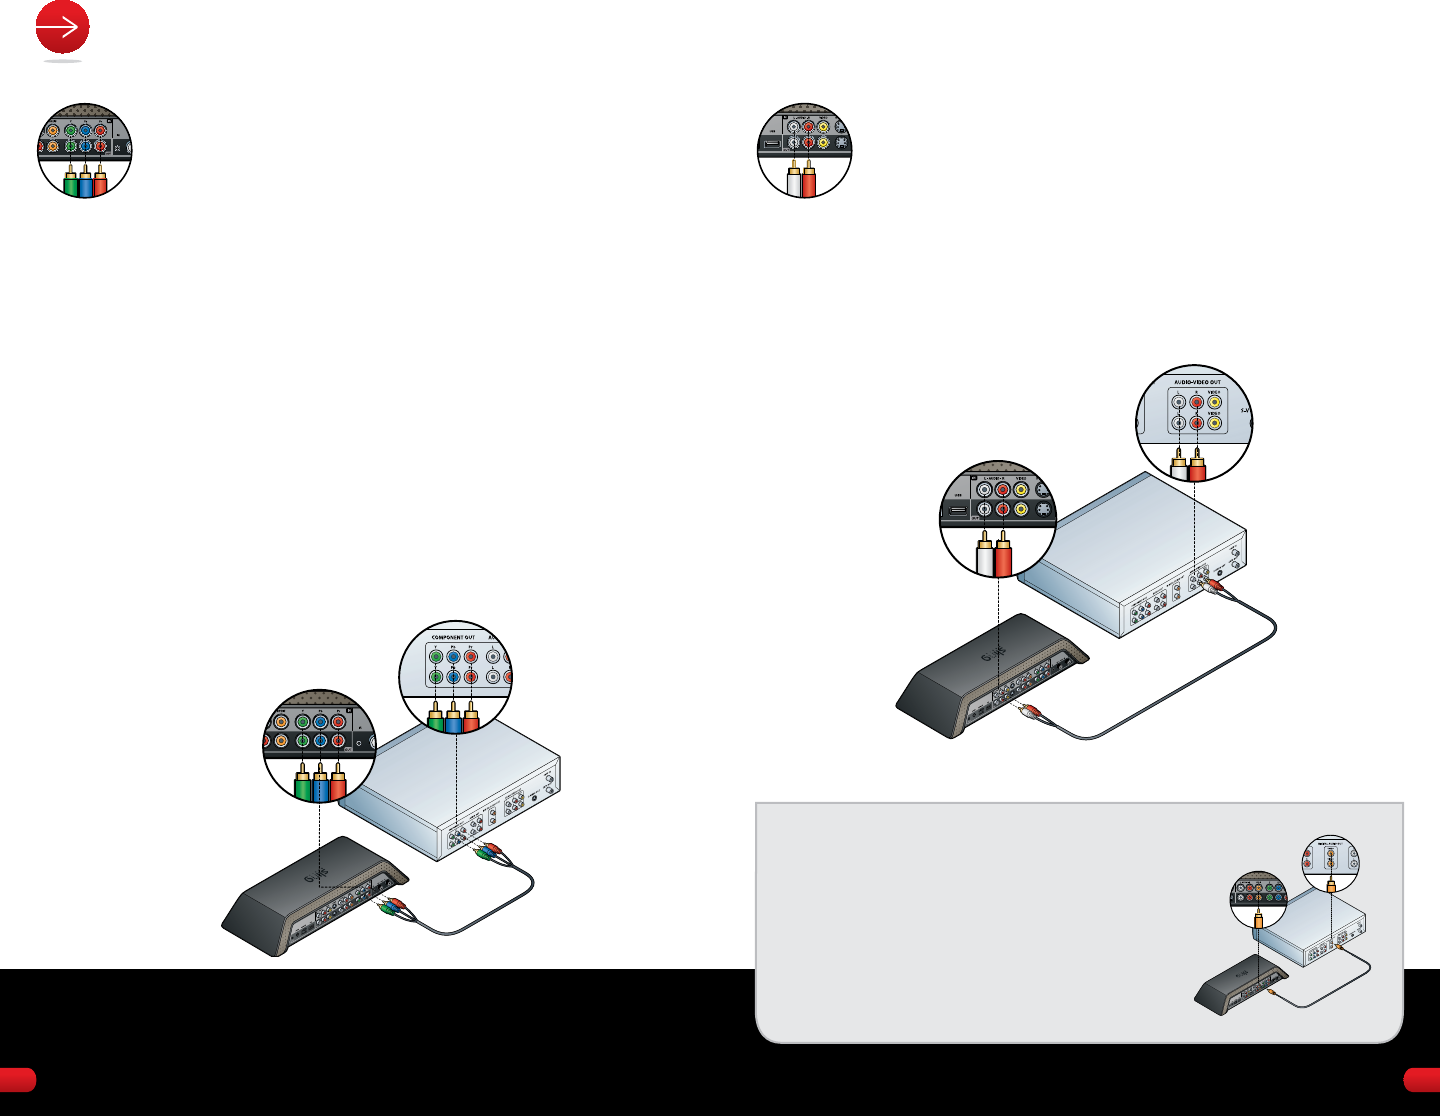
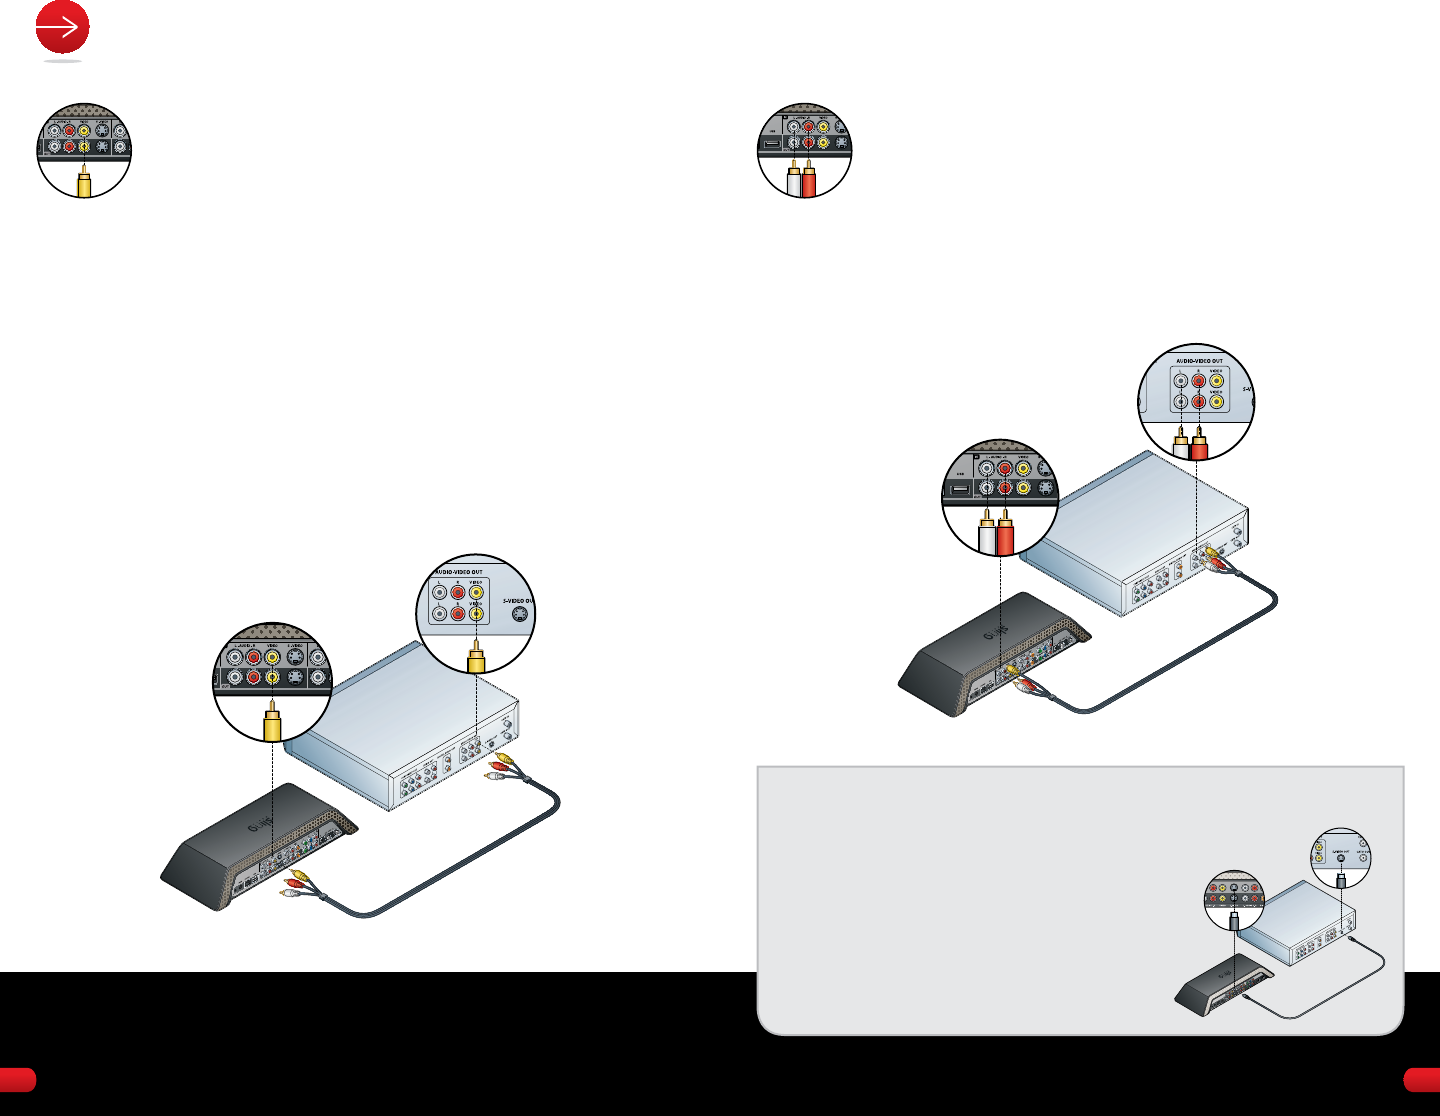
Step 1: CONNECT YOUR HD SOURCE
VIDEO:
If y'all have a high-definition device, you lot can connect it to
your Slingbox with the included component video cables.
Component video cables havdue east a set up of green, blue and red
connectors. Connect these cables to the component jacks
labeled IN on your Slingbo10 PRO-HD. These jacks are in the top
row on the bacgrand of your Slingbox. Connect the other ends of
the component cables to the output component jacks on your
Hd video source
.
If your Hard disk A/V source is already continued to your TV with
component cables, disconnect them from the TV and then
re-connect these cables to the component IN jacks on your
Slingbox. Use the matching cable set included with your
Slingbox to connect to the component OUT jacks on the back of
your Slingboten, and then to the IN jacks your TV.
NOTE: THE SLINGBOX PRO-Hard disk SUPPORTS RESOLUTIONS UP
TO i080i. IF YOUR A/V SOURCE OUTPUTS 1080p, YOU MUST
Gear up IT TO one080i . THE SLINGBOX Will NOT WORK WITH 1080p.
v4
AUDIO:
Composite cables also havdue east red and white connectors for
audio. Insert the red connector into the red blended jack
labeled IN on your Slingboten PRO-HD. These jacks are likewise in
the tiptop row on the bacthou of your Slingbox. Connect the other
end of this cablevision to the ruddy output audio jack on your SD
source. Repeat this process with the cable that has the white
connectors.
STEP ii: CONNECT YOUR SD SOURCE
VIDEO:
If you have an SD (standard definition) A/Five device, you tin
connect it to your Slingbo10 using the included blended
cables. Composite cables have a yellodue west connector for video,
along with scarlet and white connectors for sound. Insert the
yellodue west connector into the yellow composite jacchiliad labeled IN on
your Slingboten PRO-Hard disk. This jack is in the top row on the back of
your Slingbox. Connect the other end of this video cable to the
yellowest video output jack on your SD video source
If your SD A/Five source is already connected to your TV with
composite cables, disconnect them from the Boob tube and then
re-connect these cables to the composite IN jacks on your
Slingbox. Employ the matching cable set up included with your
Slingbox to connect to the composite OUT jacks on the back of
your Slingboten, and and so to the IN jacks your TV.
vii6
TIP: If your SD source has an S-Video jack, use it instead of the yellow
video connector to go higher quality video. Connect the Southward-Video cablevision to
the South-Video jack labeled IN on your Slingbox PRO-Hard disk drive.
Connect the other end of the S-Video cable to the output
Southward-Video jack on your A/ V source. An S-Video connection
carries video only no sound, so connect the audio every bit
explained above. Employ the red and white connectors that
are role of the included composite cables. You don't
need to use the yellowish connector if you accept Southward-Video.
STEP iv: ATTACH REMOTE Control IR Cablevision
Connect the remote control IR cable to the IR jack on the
Slingbox. Next, place a remote control IR cablevision head on the top
or bottom of your A/5 device so it points at its IR sensor.
Brand sure that the caput of the remote control
IR cable extends out far enough over the front
your A/V device to send a point to it. You may
want to affix the remote control IR cables using
the adhesive pads after you've determined their
correct positions.
TIP: The IR sensor is on the front end of your A/V device. Some sensors are behind
a dark, reddish plastic window. Others may be hidden behind the plastic on the
forepart of the device. If you don't come across the sensor, shine a flashlight on the front of
the device and look for a small bulb similar to the ane on the terminate of
the remote control IR cable. To control more than 1 device, you lot
can apply the multi-head remote control IR cablevision that came with your
Slingbox PRO-HD. You can use 1 or more IR heads per device every bit
needed.
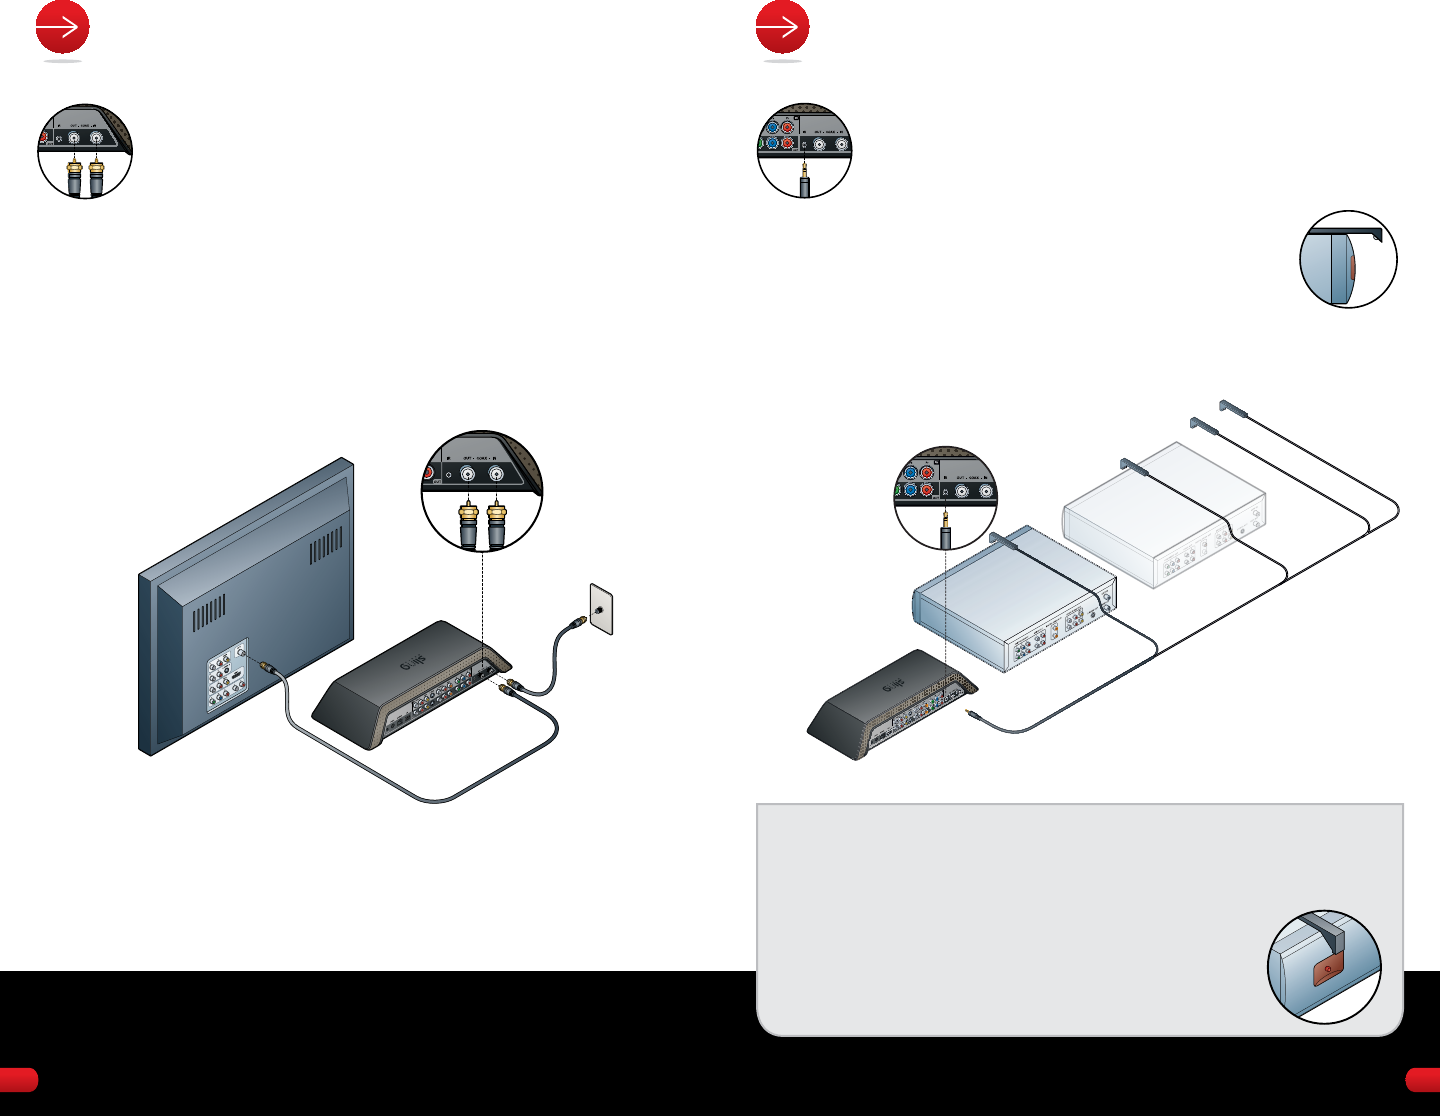
Pace 3: CONNECT YOUR COAX SOURCE
Coaxial cablevision carries both video and sound. They're used to
connect antennas or to some cable TV systems. Connect your
coaxial source to the jack labeled COAX IN on your Slingbox
PRO-Hard disk
.
If your coaxial A/V source is already connected to your Television with
a coaxial cable, disconnect information technology from the TV and so re-connect
this cable to the COAX IN jacone thousand on your Slingbox. Employ the
matching cable included with your Slingbox to connect to the
COAX OUT jack on the back of your Slingbox, and then to the
IN jacthousand your Television.
ixeight
IR SENSOR SIDE VIEW
eleven10
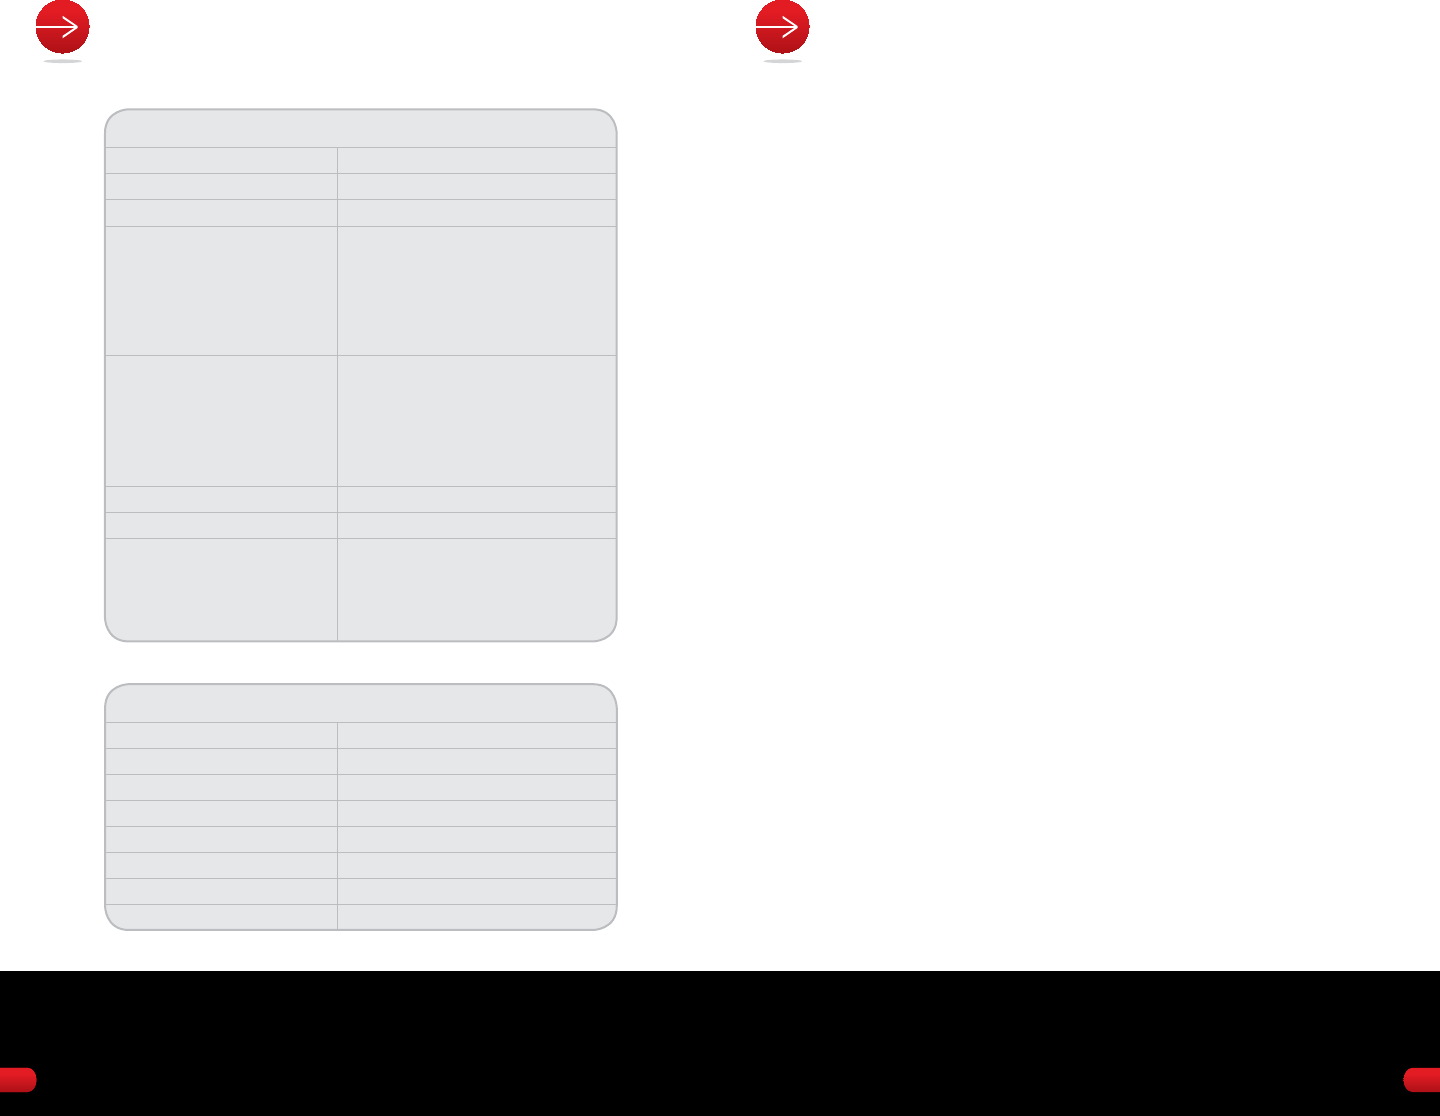
STEP half dozen: ATTACH THE Power ADAPTER
• Connect the power adapter cable into the Slingbox
POWER jack.
• Plug the power adapter into an electrical outlet.
WARNING: THE INCLUDED POWER SUPPLY IS FOR THE
SLINGBO10 PRO-Hd. Practise NOT Employ THIS POWER SUPPLY
ON THE SLINGBOTen CLASSIC, THE SLINGBOX AV OR THE
SLINGBOX PRO.
When plugged in, the power light comes on, and the lights
blink a few times equally the Slingbox starts up. The network light
volition remain on while your Slingboten is successfully connected to
your network. Both the power and network lights should be on
and not blinking.
TIP: If the network light does not come on within 30 seconds,
make sure that you have correctly continued the Slingbox to your
network router. Bank check the connectors to run across that they are firmly
inserted. If the network light still does not come up on, try resetting
your Slingbox by belongings practisewn the reset simplyton on the back for i0
seconds. When you allow go of the button, the network light should
come on. Come across Troubleshooting on folio 1three for more than solutions, or
get to: http://support.slingmedia.com
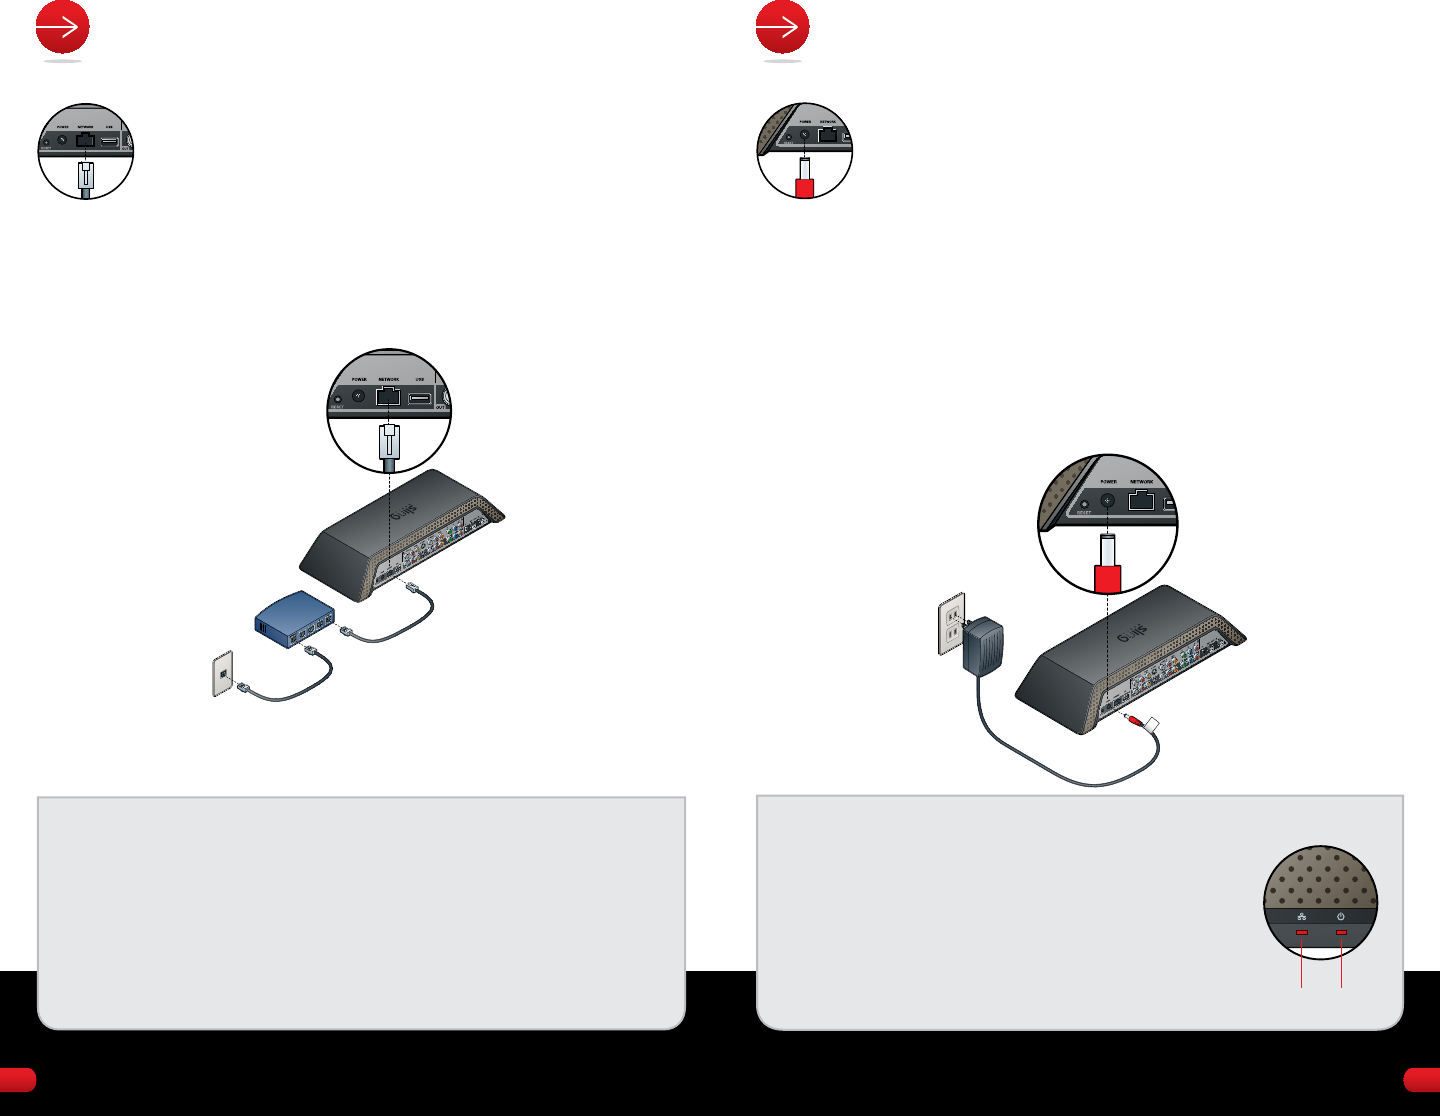
Step v: LINK TO YOUR NETWORK
• Plug 1 end of the Ethernet cable into the Slingbox
NETWORK jack.
• Connect the other end into your router.
The Slingboten works with about any router with a high-speed
Cyberspace connection or a broadband home network. You must
have a router to use the Slingbox.
TIP: For best video performance, Sling Media recommends that you use wired
Ethernet to connect Slingbox PRO-Hard disk to your home network. Westwardireless connections
may not be able to handle the big amount of information in a high-quality video
stream.
Is your Tv in a different room than your router? Apply a SlingLink TURBO to avoid using
wireless connections. The SlingLink TURBO acts as an extension string for the Cyberspace
by using your abode'due south existing electric wiring to transmit the Ethernet signal. For
more than information, go to: http://world wide web.slingmedia.com/go/accessories POWERNETWORK

elevenx 13
NEED MORE HELP?
Get to support.slingmedia.com
TROUBLESHOOTING
1. If the power light is not on:
Disconnect the power cable from both the Slingbox and the electrical outlet and
reconnect them - making certain that they are secure.
2. If the network light is non on:
Disconnect the Ethernet cable from the bac1000 of the Slingbox and re-insert it. You
will hear a click when it is fully inserted.
Practise the same with the other stop of the Ethernet cable, making sure that it is
attached to your router.
Make certain that your router is on the aforementioned home network as your Slingbox.
three. If the network light is continuously blinking:
Press and hold the reset onlyton on the back of the Slingbox for ane0 seconds. The
lights on the front of the Slingbox quickly flash from left to right, and and then flash
slowly. This resets the Slingbox to manufacturing plant settings. If you lot've already configured
your Slingbox using SlingPlayer, y'all'll need to get through the setup assistant once more
after you reset your Slingbox.
Turn your router off and back on again. Annotation: Most routers do non have on/off
switches. You may need to unplug and plug the router back into the electric
outlet.
4. If the SlingPlayer softwardue east does non discover the Slingbox on your network:
Some firewall security software blocks the Slingbo10 from being recognized on
your habitation network. If this occurs, you demand to change your security
software readytings to come across the Slingbox as a device on your network.
5. If you don't see your sound/video source while installing the SlingPlayer software:
Re-check the cable connections between your A/ V devices and the Slingbox.
Make sure that the cables are fully inserted into the connectors on the back of the
Slingbox and your A/V devices. The cables should fit snugly.
half dozen. If the SlingPlayer application is not controlling your A/V source:
Make certain the remote control IR cable is fully inserted. Move the IR emitters to a
different location on the front of your cable/satellite box or DVR.
7. If your TV is no longer receiving a bespeak:
Connect the output of the Slingbox to your Television receiver'southward inputs. Make sure your TV is gear up to
the correct input. For instance, if your Slingbox is connected to your TV'southward INPUT 1
jacks, change the input readyting to INPUT one.
Turn your router off and back on again. Note: Most routers do not haveast on/off
switches. You may need to unplug and plug the router back into the electrical
outlet.
*To watch your Slingbox on your mobile phone you must purchase SlingPlayer Mobile software separately.
In that location are versions of SlingPlayer Mobile specific to many PDAs, mobile phones, and smart phones. Visit
http://www.slingmedia.com for a list of supported mobile devices and to download a xxx mean solar day gratuitous trial of
SlingPlayer Mobile.
STEP 7: INSTALL THE SOFTWARE
STEP 8: ENJOY YOUR SLINGBOX!
Now that you have the Slingbox continued, you're ready to install the
software. Before you do, make sure that your computer is on the same
network as your Slingbox.
Adjacent, go to http://downloads.slingmedia.com and follow
the instructions to practicewnload the latest software to your
PC or Mac. One time you've downloaded the software, follow
the onscreen instructions to install SlingPlayer™ and to
configure your Slingbox. Configure your Slingbox on your
computer before you install SlingPlayer Mobile on your
PDA, mobile phone, or smart phone.*
Congratulations! Nowest that you'fivedue east prepare up everything, you're now set up to enjoy
watching your TV on your PC, Mac or mobile telephone* - at home or 3,000 miles
away - via the Internet. Thanks for buying the Slingbox PRO-Hard disk drive.
POWERNETWORK
12
TECHNICAL SPECIFICATIONS
Dimensions (unit only) one3.25" (due west) ten v.63" (d) x 2.38" (h)
Weight (unit only) 4 lbs.
Power Requirements 5V/4A
Inputs RCA blazon sound (LR)
S/PDIF audio
Component video (RCA blazon)
Composite video (RCA blazon)
Coaxial input
Outputs RCA type audio (LR)
South/PDIF audio
Component video (RCA blazon)
Composite video (RCA type)
Coaxial output
Source Command IR emitter
Network 10/100 Base-T Ethernet RJ-45
Display (3) front panel LEDs:
•Status
•Network
•Power
Make Ktec
Model Number KSAFF0500400W1US
Input Voltage Range 100VAC to 240VAC
Input Frequency Range 50 Hz to sixty Hz
Input Current 0.8A Max
Output Voltage +5V
Output Regulation iv.6~5.4V
Output Load Range 0~4.0A
SLINGBOX PRO-HD (Us/CAN) SPECIFICATIONS:
SLINGBOX PRO-HD POWER ADAPTER (US/CAN):
Due westARRANTY, SAFETY, REGULATORY, AND
LEGAL INFORmATION
1014 15
Sling Media, Inc. - Slingbox
Express Warranty and Non-Westarranty Returns Policy
Limited Warranty:
What Does This Warranty Cover? This westarranty simply covers defects in Slingbox
hardware products purchased from Sling Media authorized resellers.
How Long Does the Coverage Final? Your Slingbox hardware product is
warranted to exist free of defects for one (1) year from the original date of
purchase.
What will Sling Media Practise? If your Slingbox hardware product is defectivdue east,
Sling Media volition repair or replace it with the aforementioned product, or another
product with similar features.
How Do You Get Warranty Service? Please contact the Sling Media technical
support squad at one -877-GO-SLING (option #4) to verify eligibility. Once the
Sling Media technical back up agent determines that your eligible Slingbox
product is defective, that amanuensis volition provide you lot with a Return Material
Authorization (RMA) number and the address of the Sling Media Returns
Middle. Returns sent to the Sling Media Returns Center or to the corporate
offices without an RMA number will be rejected.
Upon receipt at Sling Media'due south designated Returns Center, Sling Media will
service the original Slingbox hardware production and use reasonable efforts
to transport it, or the replacement product, to you inside one0 business daysouth.
Repaired or replacement products will be shipped bacm to y'all at Sling
Media's expense. You are responsible for costs to ship the original Slingbox
hardware product to Sling Media'south Returns Center for repair or replacement.
What Does This Warranty Not Comprehend? You may only exercise this warranty
from the country in which yous purchased your Slingbox hardware product.
Sling Media will not send repaired or replacement products to addresses
outside the country in which you purchased your Slingbox hardware product.

Also, consequential and incidental damages are not recoverable nether this
warranty. Some states do non allow the due eastxclusion or limitation of incidental
or consequential damages, so the above limitation or exclusion may non
apply to you. Sling Media may charge for out-of-warranty service at a charge per unit
of $1l (USD), which includes costs to ship the repaired or replacement
product to you.
ANY Unsaid WARRANTIES, INCLUDING Implied Due westARRANTIES OF
MERCHANTABILITY AND Fitness FOR A PARTICULAR PURPOSE, ARE
LIMITED TO THE DURATION OF THE WARRANTY STATED ABOVE (I.E. ONE
Year FROM THE DATE OF PURCHASE).
This westwardarranty gives you specific legal rights, and you may too have other
rights which 5ary from state to state. To the maximum extent permitted by
police, Sling Media reserves the right to modify this warranty at whatsoever time.
Non-Warranty Returns Policy:
For products purchased at Sling Media'due south online storeastward:
If you purchased your Slingbox hardware product directly from Sling Media'due south
online store and are dissatisfied, you may return it at your expense within thirty
24-hour intervals from original shipment as long equally information technology is in good condition.
Please contact the Sling Media Online Store billing support team at
1 -877 GO-SLING (option #2) to obtain a Return Material Authorization (RMA)
number. Our agents will aid you through the process through which
you tin can return your production. Products must be shipped to Sling Media's
designated Returns Eye using a trackable shipping method, and packaged
appropriately for safdue east shipment. You are responsible for ane-way shipping
charges.
Returns sent to the Sling Media Returns Centre or to the corporate offices
without an RMA number volition be rejected.
Upon receipt at the designated Sling Media Returns Middle, Sling Media
volition refund the purchase price of your production (including tax). Your original
aircraft and handling costs will not be refunded.
For products purchased at a retail stordue east:
If you purchased your product through a retail location (online or in person),
you may exist eligible for a total credit in accordance with the retailer's render
policy. You should contact the retail location where yous purchased the
production, as return policies vary. Sling Media cannot take product returns
for products purchased through a retail location.
xsixteen 17

Important Safety Instructions
• Practice not utilise a Slingbox almost westater.
• Do not place the product near oestrus sources such as direct sunlight,
radiators, heat registers, stoves, or other apparatus (including
amplifiers) that produce heat.
• Do non block the ventilation holes on the Slingbox. A Slingbox requires
adequate ventilation. Do not place a Slingbox in a chiffonier or built-
in installation unless sufficient fiveentilation is provided. Practise not place
anything on top of a Slingbox, including some other Slingbox.
• Operate this product from the type of power source indicated on the
mark label.
• Route power cables then they are not probable to be walked on, rolled
over, or pinched by items placed upon or confronting them, or otherwise
subject to corruption, paying particular attention to cords at plugs,
convenience receptacles, and the indicate where they go out from the
product.
• Never push objects of any kind into this production through openings as
they may touch dangerous 5oltage points or brusk-out parts that could
result in a fire or electric shocg. Never spill liquid of any kind on the
product.
• Unplug a Slingbox before cleaning. Use only a dry cloth to make clean the
Slingbox.
• Do not place this product on an unstable cart, stand, tripod, bracket,
or table.
Lightning
For added protection of this product during a lightning storm, or when it is
left unattended and unused for long periods, unplug information technology from the wall outlet.
Servicing
Do not attempt to service this product yourself, every bit opening or removing
covers may eastwardxpose you lot to dangerous voltage or other hazards. Refer
all servicing to qualified service personnel. Conthuman activity your local office for
servicing information.
Damage requiring service
Unplug this product from the wall outlet and refer servicing to qualified
service personnel nether the following atmospheric condition:
• When the power-supply cord or plug is damaged.
• If liquid has been spilled, or objects have fallen into the product.
• If the production has been exposed to rain or water.
• If the product does not operate ordinarily by following the operating
instructions. Adjust merely those controls covered by the operating
instructions. An improper adjustment of other controls may result in
harm and will often require eastwardxtensive due westork by a qualified technician to
restore the product to its normal operation.
• If the product has been dropped or damaged in any way.
• When the product exhibits a distinct change in performance.
Replacement parts
When replacement parts are required, be sure the service technician has
used replacement parts specified by the manufacturer or parts that have
the aforementioned characteristics as the original part. Unauthorized substitution may
result in fire, electric shock or other hazards.
Safety check
Upon completion of any service or repairs to this product, ask the service
technician to perform safety checks to determine that the product is in
proper operating condition.
Please read all of these instructions and retain for future reference.
Follow all due westarnings and instructions.
teneighteen 19
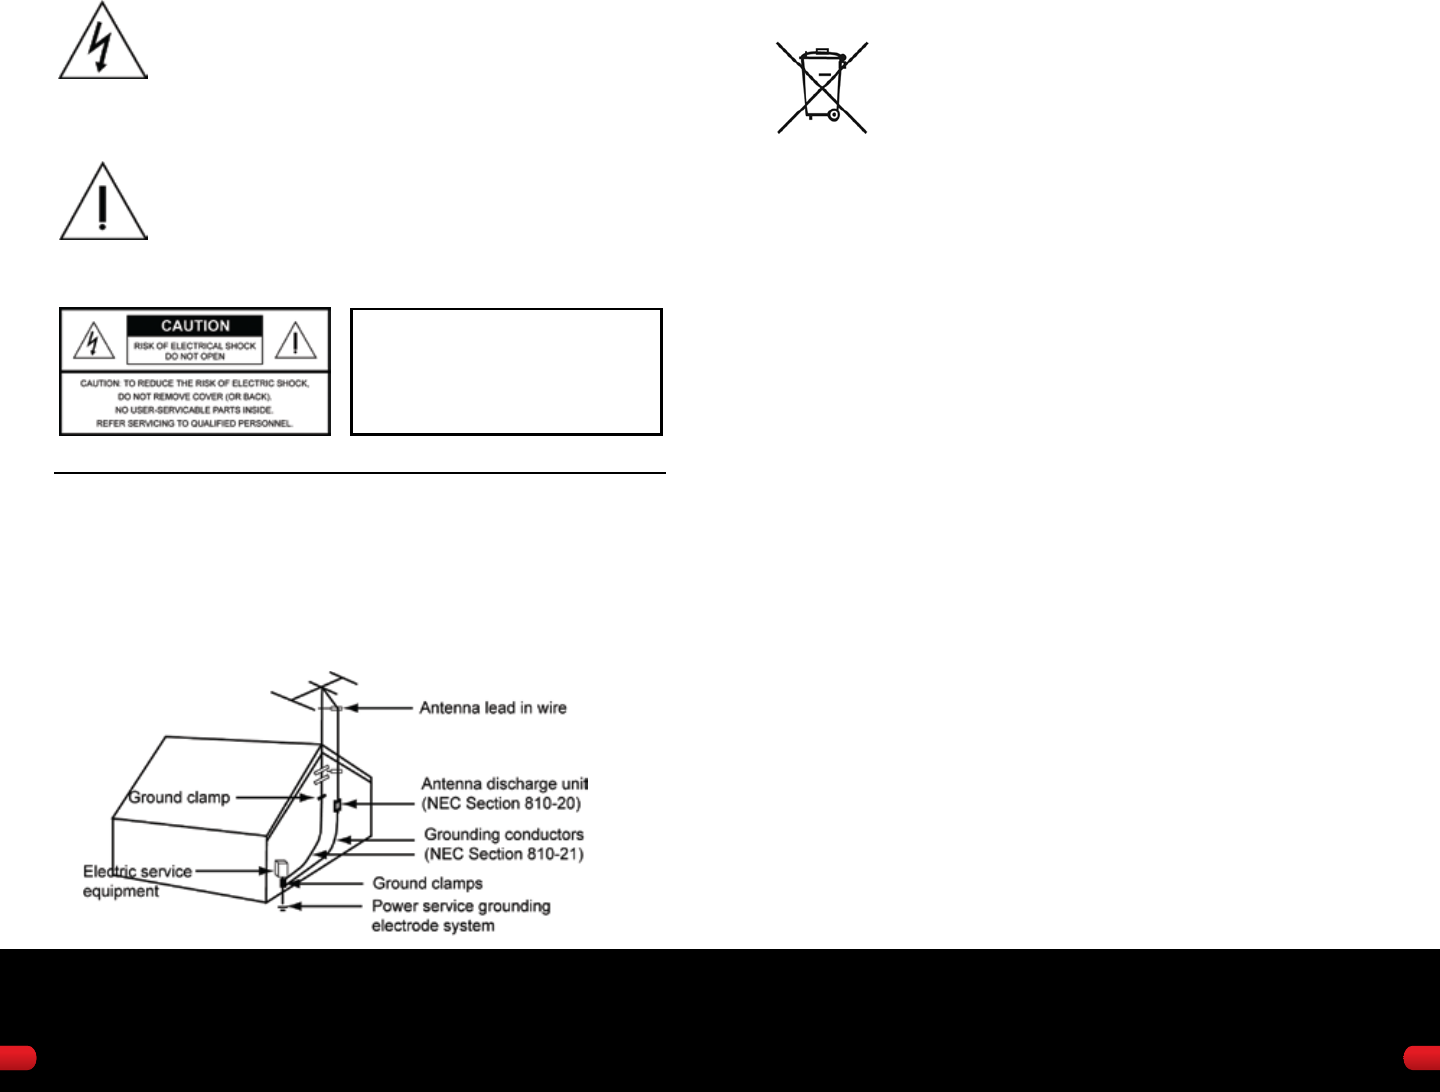
The lightning flash with arrowhead symbol, inside an
equilateral triangle, is intended to warning the user to the
presence of uninsulated "unsafe 5oltage" within the
product's enclosure that may be of sufficient magnitude to
establish a risk of electrical shock to persons.
The exclamation point within an equilateral triangle is intended
to alarm the user to the presence of of import operating
and maintenance (servicing) instructions in the literature
accompanying the product.
Ecology Information
This symbol indicates that your Slingbox must be disposed of
properly according to local laws and regulations. When your
Slingbox reaches its end of life, contact your local authorities
to acquire about recycling options.
Sling Media cares near the environment. Some of our packaging materials
are made from recycled paper and all of our packaging is designed to be
recycled.
Federal Communications Commission Notices
This device complies with Part 1five of the FCC Rules. Operation is subject
to the following two atmospheric condition: (one) This device may not cause harmful
interference and (ii) this device must accept any interference received,
including interference that may cause undesired operation.
This equipment has been tested and found to comply with the limits for a
class B digital device, pursuant to part 15 of the FCC Rules. These limits are
designed to provide reasonable protection against harmful interference in
a residential installation. This equipment generates, uses and tin can radiate
radio frequency energy and if not installed and used in accordance with
the instructions, may cause harmful interference to radio communications.
However, there is no guarantee that interference will not occur in a particular
installation. If this equipment does cause harmful interference to radio or
television reception, which tin can exist determined by turning the equipment off
and on, the user is encouraged to try to right the interference by 1 or
more of the following measures:
• Reorient or relocate the receiving antenna.
• Increase the separation between the equipment and receiver.
• Connect the equipment into an outlet on a circuit different from that
to which the receiver is connected.
• Consult the dealer or an experienced radio/Tv technician for help.
Warning:
To reduce the risk of fire or electric
shock, practice not betrayal this product
to pelting or moisture.
1020 21
Note to CABoob tube Installer:
This reminder is provided to call the CATV system installer's attention to
section 820-forty of the NEC, which provides guidelines for proper grounding
and, in particular, specifies that the cable ground shall be connected to the
grounding system of the edifice, equally close to the betoken of cable entry as
practical.

This equipment has been certified to comply with the limits for a class B
computing device, pursuant to FCC Rules. Operation with not-approved
equipment or cables is probable to result in interference to radio and Boob tube
reception. The user is cautioned that changes and modifications made to
the equipment without the approval of manufacturer could void the user'due south
authority to operate this equipment.
This Class B digital apparatus meets all requirements of the Canadian
Interference-Causing Equipment Regulations. Cet appareil numerique de
la classe B respecte toutes les exigences du Reglement sur le materiel
brouilleur du Canada.
Legal Notices
SoundTouch
SlingPlayer software uses the SoundTouch Audio Processing Library
(http://www.surina.internet/soundtouch/), which is licensed nether the terms of
the GNU Lesser General Public License (http://www.gnu.org/ licenses/).
SoundTouch Library Copyright © Olli Parviainen 2001-2005.
Microsoft
This product includes technology owned by Microsoft Corporation and
under a license from Microsoft Licensing, GP. Use or distribution of such
technology outside of this production is prohibited without a license from
Microsoft Corporation and/or Microsoft Licensing, GP as applicable.
zConf
SlingPlayer software uses Dynamic Linked Library, Copyright zConf, LLC.
Dolby Laboratories
This production contains one or more programs protected under international
and U.Southward. copyright laws every bit unpublished works. They are confidential and
proprietary to Dolby Laboratories. Their reproduction or disclosure, in whole
or in part, or the production of derivativeast works there from without the
express permission of Dolby Laboratories is prohibited. Copyright i993-2002
by Dolby Laboratories. All rights reserved. Manufactured under license from
Dolby Laboratories.
1022 23

1024 25
NOTES:

PRO-Hard disk drive

How To Set Up Slingbox Pro Hd,
Source: https://usermanual.wiki/Sling-Media/SBPB3051/html
Posted by: hammerthetwor.blogspot.com
0 Response to "How To Set Up Slingbox Pro Hd"
Post a Comment