

How To Set Up Virtual Environment
Create Virtual Environment using "virtualenv" and add it to Jupyter Notebook
Are you a Machine Learning Engineer and working with Python and Jupyter Notebook? In this commodity, you will come across why Virtual Environment is needed, the difference betwixt some existing tools and how to add a virtual environment to Jupyter Notebook.

Here is the article outline:
- Why demand Virtual Environment?
- What is the departure betwixt
virtualenv,virtualenvwrapper,penvandvenv? - Create a Virtual Environment using
virtualenv - Add together Virtual Environment to Juypter Notebook
Why need Virtual Environment?
Like other programming linguistic communication, Python has its own way of downloading, storing and resolving packages (or libraries). By default, every Python project on your machine will use the default Python site-packages directory (Which is associated with the main Python installation and is represented every bit base(root) environment). You tin can find that by:
          >>> import site
>>> site.getsitepackages()
['/Users/admin/anaconda3/lib/python3.7/site-packages']
Imagine a scenario where you are working on two machine learning projects and one of them uses TensorFlow v1.five and the other uses TensorFlow v2. This would be a real problem since Python can't differentiate between versions in the site-packages directory. Both TensorFlow v1.5 and TensorFlow v2 would reside in the aforementioned directory with the same proper noun. Since in that location is no differentiation between versions, both projects would be required to employ the same version, which is unacceptable in this example. This is where virtual environments tools come into play.
The main purpose of Python virtual environments is to create an isolated environment for Python projects. Each project can have its own dependencies, regardless of what dependencies every other project has.
In addition, a virtual environment is also useful when you need to work on a shared organisation and exercise non accept permission to install packages as you will be able to install them in the virtual environment.
Here are some popular libraries/tools for you to create virtual environment in Python: virtualenv, virtualenvwrapper, pvenv and venv.
If you lot are interested on using conda to create virtual environment, y'all can have a look:
What is the difference between virtualenv, virtualenvwrapper, pvenv and venv?
-
virtualenv: is the most popular library to create isolated Python environs. You can become it by runningpip install virtualenv. Information technology works past making an exact copy of your Python interpreter binary (thepythonorpython3) in a local directory. Activating an environment is done by modifying thePATHenvironment variable to prefix it with a custom bin directory. -
virtualenvwrapper: is a set of extension tovirtualenv. It gives you commands likemkvirtualenv,lssitepackages, and especiallyworkonfor switching between differentvirtualenvdirectories. This tool is very useful if you desire multiplevirtualenvdirectories. -
pyvenv: is a library shipped with Python three, simply depreciated in Python three.6 because it had issues. -
venv: is a library shipped with Python iii.iii+. You can run usingpython3 -m venv <path_to_new_env>.Information technology serves the same purpose asvirtualenv, and additionally you can extend it.
virtualenv continues to be more than popular than venv, especially since the one-time supports both Python 2 and 3. The general recommendation for beginners is that start by learning virtualenv and pip, which piece of work both Python ii and three. And in a variety of situations, choice up other tools once you lot start needing them.
Create a Virtual Environs using "virtualenv"
Install the virtualenv
Check if you lot accept virtualenv
which virtualenv If no, enter the following in your terminal to install it.
pip install virtualenv Create a virtual environment
To create a virtual environs in the current directory:
virtualenv <my_env_name> Here is an case to create a virtual environment "nlp" in the current directory "/Users/admin/Code/WorkSpace/python-venv/".
          ⇒  virtualenv            nlp
Using base of operations prefix '/Users/admin/anaconda3'
New python executable in /Users/admin/Code/WorkSpace/python-venv/nlp/bin/python
Installing setuptools, pip, bicycle...          done.
Create an environment with a specific version of Python
You lot can besides use the Python interpreter of your choice (like python2.7).
virtualenv -p /usr/bin/python2.7 <my_env_name> Create an environs from a requirements.txt file
Typically the steps y'all ever take are:
-
virtualenv <my_env_name>to create a new surroundings -
source <my_env_name>/bin/activateto activate the new environment -
pip install -r requirements.txtto install the requirements in the current environment
Culling, you can consider using pipenv, which combines pip and virtualenv.
Activate the virtual environment
You lot can activate the virtual environment by running the post-obit control:
source <my_env_name>/bin/activate Here is an example to activate the "nlp":
          ⇒  pwd
/Users/admin/Lawmaking/WorkSpace/python-venv          ⇒            source nlp/bin/activate                    ⇒  which python
/Users/admin/Lawmaking/WorkSpace/python-venv/nlp/bin/python
Conciliate the virtual surround
To deactivate the current environment you lot tin can blazon:
deactivate Cheque which Environs you are in
Y'all tin can verify apace yous are in the environs by running which python or which pip which will return the path of the python executable in the environment if all went well:
          ⇒  which python
/Users/admin/Code/WorkSpace/python-venv/nlp/bin/python          ⇒  which pip
/Users/admin/Lawmaking/WorkSpace/python-venv/nlp/bin/pip
Remove an surround
To remove an surroundings, make sure you take deactivated it, then cd into the surround directory and type
sudo rm -rf <my_env_name> Add Virtual Environment to Jupyter Notebook
Makes certain that the IPython kernel is bachelor, only you have to manually add a kernel with a different version of Python or a virtual surround.
First, you need to activate your virtual environment.
Next, install ipykernel which provides the IPython kernel for Jupyter:
And then, you tin can add your virtual surround to Jupyter past typing:
python -g ipykernel install --user --proper name=<my_env_name> For example: add together virtual environs "nlp" to Jupyter and it should print the post-obit:
          ⇒  python -m ipykernel install --user --proper name=nlp
Installed kernelspec nlp in /Users/admin/Library/Jupyter/kernels/nlp
Afterwards that, you could cd into the env folder and inspect the configuration file kernel.json
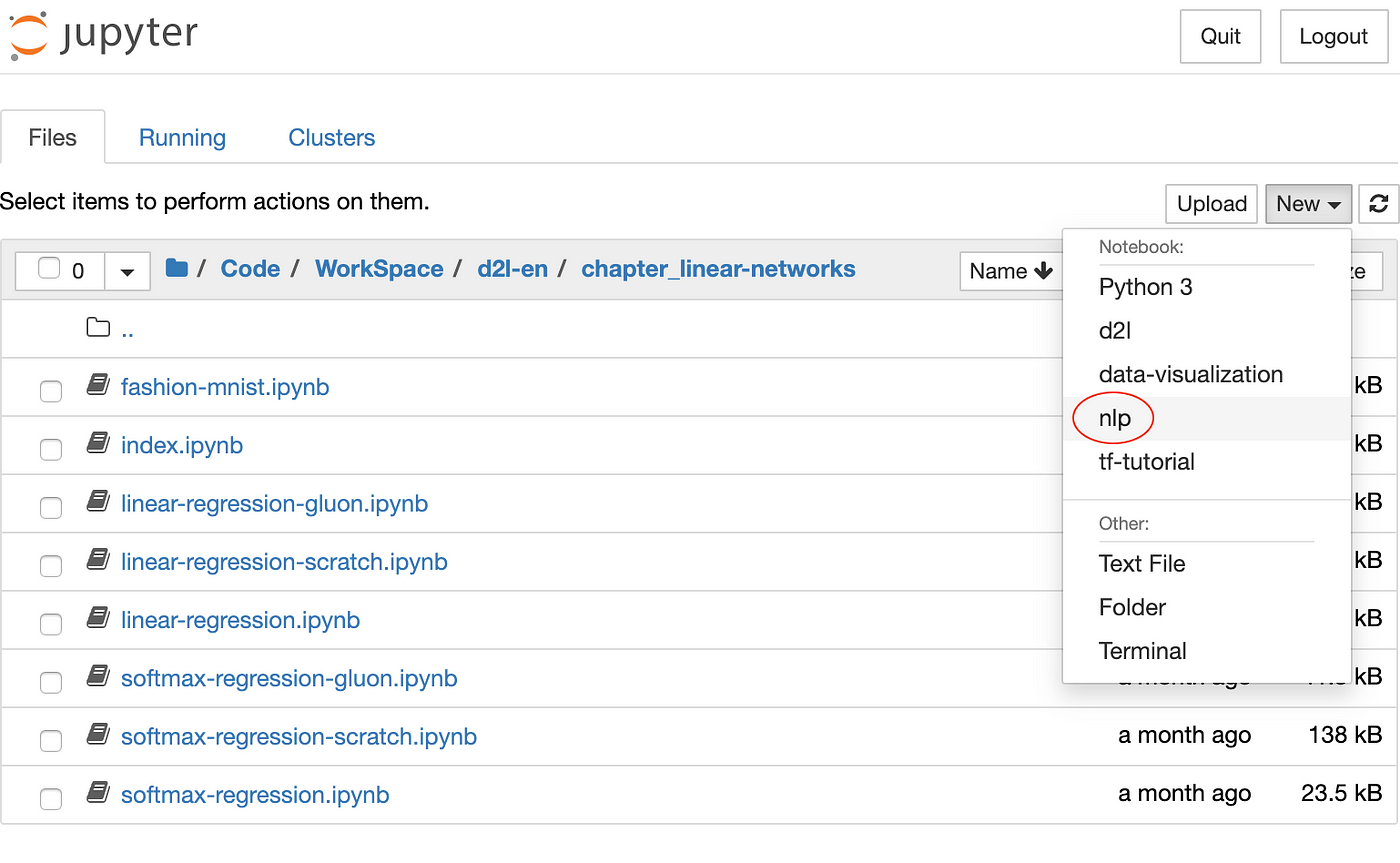
Now you are able to choose the surroundings as a kernel in Jupyter Notebook. Here is what that would look similar:

Remove Virtual Environment from Jupyter Notebook
After you deleted your virtual environment, you'll desire to remove information technology also from Jupyter. Let'south showtime meet which kernels are available. You can list them with:
          ⇒  jupyter kernelspec listing
Available kernels:
            d2l        /Users/admin/Library/Jupyter/kernels/d2l
            nlp        /Users/admin/Library/Jupyter/kernels/nlp
            ...
Now, to uninstall the kernel, you can blazon:
jupyter kernelspec uninstall <my_env_name> Relish!
And that's about information technology. Thanks for reading.

How To Set Up Virtual Environment,
Source: https://towardsdatascience.com/create-virtual-environment-using-virtualenv-and-add-it-to-jupyter-notebook-6e1bf4e03415
Posted by: hammerthetwor.blogspot.com
0 Response to "How To Set Up Virtual Environment"
Post a Comment